Mathematics (Syllabus D) 4024/12 — May/June 2024
Cambridge O-Level · Non-calculator · worked solutions for every part, with the mark scheme
Topics Number · Algebra and Graphs · Geometry · Statistics · Mensuration · Probability · +2 more
Here are five temperatures in .
Write these temperatures in order, starting with the lowest.
______ , ______ , ______ , ______ , ______
lowest
Approach
To write the temperatures in order starting with the lowest, we compare the values. Negative numbers are smaller than positive numbers and zero. Among negative numbers, the one with the larger absolute value is smaller (further to the left on the number line).
Working
The given temperatures are , , , , and .
- Identify the negative numbers: and . Since , is lower than . So, .
- Zero () is greater than any negative number but less than any positive number. So, .
- The remaining positive numbers are and . Clearly, .
Combining these comparisons:
Answer
-6, -2, 0, 1, 4
Walkthrough
We are asked to order five temperatures from lowest to highest. This means arranging them in ascending order.
First, look at the signs of the numbers. We have two negative numbers ( and ), one zero (), and two positive numbers ( and ).
On a number line, numbers to the left are smaller than numbers to the right. Negative numbers are always to the left of zero, and positive numbers are always to the right. Therefore, the order will start with the negative numbers, then zero, then the positive numbers.
Among the negative numbers, is further to the left (more negative) than . So, comes first, followed by .
Zero () sits between the negatives and positives.
Finally, among the positive numbers, is smaller than .
So the full sequence is , then , then , then , then .
Key Takeaways
- Negative numbers are smaller than zero and positive numbers.
- When comparing negative numbers, the number with the larger magnitude (absolute value) is actually the smaller number (e.g., ).
- Ordering from "lowest" or "smallest" means ascending order.
Common Mistakes
- Thinking that is larger than because 6 is larger than 2. This is a common error when dealing with negative numbers.
- Forgetting that zero is greater than negative numbers.
- Mixing up the order of the positive numbers.
Things to Be Careful About
- Ensure you read the question carefully: it asks for the order starting with the lowest. If it asked for highest to lowest, the order would be reversed.
- Pay attention to the negative sign. It changes the value completely.
Write these numbers in order of size, starting with the smallest.
______ , ______ , ______
smallest
Approach
To compare numbers given in different formats (decimal, fraction, percentage), it is easiest to convert them all into the same format. Decimals are generally the most straightforward for comparison.
Working
The numbers are , , and .
-
Convert to a decimal:
-
Convert to a decimal:
-
The number is already in decimal form.
Now we compare the three decimal values:
Comparing the digits in the tenths place:
- has in the tenths place.
- has in the tenths place.
- has in the tenths place.
Since , is the smallest.
Now compare and . Both have in the tenths place. Look at the hundredths place:
- has in the hundredths place.
- has in the hundredths place.
Since , .
So the order from smallest to largest is:
Substituting back the original forms:
Answer
3/8, 40%, 0.45
Walkthrough
We need to order three numbers: , , and . Since they are in different forms, we cannot directly compare them. We must convert them to a common format. Decimals are usually the easiest for ordering.
First, take the fraction . To convert a fraction to a decimal, divide the numerator by the denominator: .
.
Next, take the percentage . To convert a percentage to a decimal, divide by 100 (or move the decimal point two places to the left): .
The number is already a decimal.
Now we have:
- (from )
- (from )
Compare them digit by digit from left to right.
All numbers have in the units place.
Look at the tenths place (first digit after the decimal):
- has .
- has .
- has .
The number with is the smallest. So () is the smallest number.
Now compare the remaining two: and . They both have in the tenths place. Look at the hundredths place (second digit):
- has .
- has .
Since , is smaller than . Thus, is smaller than .
The final order from smallest to largest is , , .
Key Takeaways
- Converting all numbers to the same format (usually decimals) makes comparison easy.
- To convert a fraction to a decimal, divide the top number by the bottom number.
- To convert a percentage to a decimal, divide by 100.
- When comparing decimals, look at each place value from left to right (tenths, then hundredths, etc.).
Common Mistakes
- Incorrectly dividing by . A common error is thinking or .
- Comparing percentages directly as whole numbers without converting (e.g., thinking is larger than from ).
- Confusing which fraction is larger when denominators are different without converting.
Things to Be Careful About
- Ensure you convert accurately. is exactly , not an approximation like if possible, though might still allow correct ordering here, precision is better.
- Remember that trailing zeros do not change the value of a decimal (), but they help in aligning place values for comparison.
- The question asks for the order starting with the smallest.
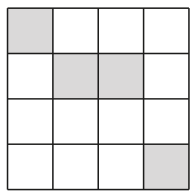
Approach
The diagram shows a 4x4 grid with shaded squares at (row 1, col 1), (row 2, col 2), (row 2, col 3) and (row 4, col 4). We need to shade one more square to create exactly one line of symmetry. We test the two diagonal lines of symmetry for a square grid.
Working
Option 1: Main diagonal (top-left to bottom-right)
The line passes through (1,1), (2,2) and (4,4). These are already shaded. The square at (row 2, col 3) is above the diagonal, so its reflection across the diagonal is (row 3, col 2). Shading (row 3, col 2) creates a line of symmetry along the main diagonal.
Option 2: Anti-diagonal (top-right to bottom-left)
The line passes through (1,4), (2,3), (3,2) and (4,1). The shaded squares (1,1) and (4,4) are reflections of each other across this line. The shaded squares (2,2) and (3,3) are reflections of each other. The square (2,3) lies on the anti-diagonal. To complete the symmetry, we must shade (row 3, col 3), which is the reflection of (row 2, col 2) across the anti-diagonal.
Both options are valid single answers.
Answer
Shade either (row 3, col 2) or (row 3, col 3).
Shade the square at row 3, column 2 OR row 3, column 3
Walkthrough
The original grid has four shaded cells: top-left (1,1), the two middle cells of the second row (2,2) and (2,3), and bottom-right (4,4). We are asked to add one more cell to create a line of symmetry.
A square grid has two diagonal lines of symmetry: the main diagonal (top-left to bottom-right) and the anti-diagonal (top-right to bottom-left). We check both.
For the main diagonal: cells (1,1), (2,2) and (4,4) lie on the line. Cell (2,3) is above the line. Its mirror image across the main diagonal is found by swapping row and column indices, giving (3,2). Shading (3,2) completes the symmetry.
For the anti-diagonal: the line goes from (1,4) to (4,1). Cell (1,1) reflects to (4,4) — both are shaded. Cell (2,3) lies on the anti-diagonal. Cell (2,2) is above the anti-diagonal; its reflection is found by mapping (r, c) to (5-c, 5-r), giving (5-2, 5-2) = (3,3). Shading (3,3) completes this symmetry.
Key Takeaways
- A square has two diagonal lines of symmetry in addition to its horizontal and vertical lines.
- Reflection across the main diagonal swaps row and column coordinates: (r, c) maps to (c, r).
- Reflection across the anti-diagonal maps (r, c) to (n+1-c, n+1-r) for an n x n grid.
Common Mistakes
- Forgetting that a square grid has diagonal lines of symmetry in addition to horizontal and vertical ones.
- Shading a square that creates a second line of symmetry when the question asks for 'one line' (though here, adding either square only creates one diagonal symmetry and no horizontal/vertical symmetry, so both are valid).
- Miscounting rows or columns when finding the reflected position.
Things to Be Careful About
- The question asks for 'one line of symmetry'. Both answers (row 3, col 2) and (row 3, col 3) are correct and each creates exactly one line of symmetry.
- Always verify that the shaded square you choose actually produces the symmetry by checking all pairs of cells.
- Use clear coordinate notation (row, column) to avoid confusion.
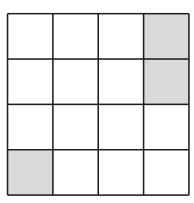
Approach
Rotational symmetry of order 2 means the diagram looks the same after a 180-degree rotation. The centre of rotation is the centre of the 4x4 grid, which is the intersection of the lines between rows 2 and 3, and columns 2 and 3.
Working
The centre of the grid is at the point (2.5, 2.5) if we use coordinates (row, column) with (1,1) at the top-left.
A 180-degree rotation about (2.5, 2.5) maps a cell at (r, c) to (5-r, 5-c).
Check the existing shaded cells:
- (1, 4) maps to (5-1, 5-4) = (4, 1). Both are shaded. ✓
- (2, 4) maps to (5-2, 5-4) = (3, 1). (2,4) is shaded, but (3,1) is not.
To complete the rotational symmetry, we must shade (row 3, column 1).
Answer
Shade the square at row 3, column 1.
Shade the square at row 3, column 1
Walkthrough
Rotational symmetry of order 2 means the shape is unchanged after a 180-degree turn. For a 4x4 grid, the centre of rotation is the exact centre of the grid, at the intersection of the middle horizontal and vertical lines.
To find the image of a shaded square under 180-degree rotation, we can use the mapping (r, c) → (5-r, 5-c) for a 4x4 grid where rows and columns are numbered 1 to 4 from top-left.
The shaded squares in Fig 2 are:
- (1, 4): its image is (4, 1), which is also shaded.
- (2, 4): its image is (3, 1), which is currently unshaded.
Shading (3, 1) completes the pattern so that every shaded square has a corresponding shaded square 180 degrees around the centre.
Key Takeaways
- Rotational symmetry of order 2 is equivalent to point symmetry or 180-degree rotational symmetry.
- For an n x n grid, the centre of rotation is at ((n+1)/2, (n+1)/2).
- The 180-degree rotation mapping for an n x n grid is (r, c) → (n+1-r, n+1-c).
Common Mistakes
- Confusing rotational symmetry with line (reflection) symmetry.
- Using the wrong centre of rotation (e.g., using a corner or edge centre instead of the grid centre).
- Miscounting when finding the rotated position.
Things to Be Careful About
- The question specifies 'rotational symmetry of order 2', not order 4 or line symmetry.
- Order 2 means there are exactly two positions where the shape looks the same during a full 360-degree rotation (0° and 180°).
- Always verify the answer by checking that all shaded cells have their 180-degree rotated counterparts also shaded.
Olga writes a list of five numbers.
The median of the numbers is 12.
The mode of the numbers is 11.
The range of the numbers is 10.
The sum of the numbers is 75.
Find the five numbers in Olga's list.
______ , ______ , ______ , ______ , ______
Approach
Let the five numbers in increasing order be . We use the given properties to determine the values of these variables step-by-step.
Working
-
Median: The median of five ordered numbers is the third number. Given the median is 12:
So the list is with . -
Mode: The mode is 11. This means 11 appears more frequently than any other number. Since 11 must be in the list and , the only positions available for 11 are or (since ).
- If 11 appeared only once, it wouldn't be the unique mode unless all others appeared once too, but we need to check frequency.
- For 11 to be the mode, it must appear at least twice (as there are 5 numbers).
- Since , the numbers equal to 11 must be among and . Thus, and .
- So far, the list is .
-
Range: The range is the difference between the largest and smallest numbers. Given the range is 10:
Substituting :
Now the list is . -
Sum: The sum of the numbers is 75. Using the formula for the mean (or simply adding them):
Calculate the known sum:
Solve for :
-
Verification: The list is .
- Ordered? Yes ().
- Median? The 3rd number is 12. Correct.
- Mode? 11 appears twice; others appear once. Mode is 11. Correct.
- Range? . Correct.
- Sum? . Correct.
Answer
The five numbers are 11, 11, 12, 20, 21.
11, 11, 12, 20, 21
Walkthrough
We are asked to find five specific numbers based on their statistical properties. Let's denote the numbers in non-decreasing order as .
-
Use the Median: The median is the middle value of an ordered set. For five numbers, it is the 3rd one. The problem states the median is 12, so we immediately know . Our list looks like this: .
-
Use the Mode: The mode is the most frequent number. The mode is given as 11. This implies that 11 is present in the list and appears more often than any other number. Since our list is ordered and , any number equal to 11 must be less than or equal to 12. Therefore, 11 must occupy the positions and/or .
- Could 11 appear just once? If and , then 11 appears once. For 11 to be the unique mode, no other number can appear more than once. But if all numbers are distinct, there is no mode (or all are modes). Typically in such problems, "the mode is 11" implies 11 is the unique mode appearing at least twice.
- Therefore, both and must be 11. This gives us the start of the list: .
-
Use the Range: The range is the spread from the smallest to the largest value. Range . Here, the smallest is and the largest is . The range is 10. So, , which means . The list is now .
-
Use the Sum: The total sum of the five numbers is 75. We add the known values and solve for the unknown :
-
Final Check: The numbers are . They are in order. The median is 12. The mode is 11 (appears twice, others once). The range is . The sum is 75. All conditions are satisfied.
Key Takeaways
- Ordered List: Always write data in ascending or descending order when dealing with median, quartiles, or range.
- Mode Implication: A stated mode usually implies repetition. If the mode is smaller than the median in an odd-sized set, it likely fills the lower positions.
- Range Definition: Remember Range = Maximum - Minimum.
- Systematic Substitution: Use one property to fix a variable, then use that value in the next property.
Common Mistakes
- Incorrect Mode Assumption: Assuming the mode could be or . Since the mode is 11 and the median is 12, the mode must be below or equal to the median.
- Ordering Error: Failing to order the numbers before identifying the median.
- Range Calculation: Subtracting in the wrong order (Minimum - Maximum) resulting in a negative number, or forgetting which is min/max.
- Arithmetic Errors: Adding the known numbers incorrectly before subtracting from the total sum.
Things to Be Careful About
- Ensure the final list is strictly in non-decreasing order.
- Verify that the calculated numbers actually satisfy ALL conditions (especially that 11 remains the unique mode). In this case, since and , no other number repeats, so 11 is indeed the unique mode.
- The question asks for the five numbers; ensure you list all of them.
Approach
Recall the relationship between kilograms (kg) and grams (g). There are 1000 grams in 1 kilogram. To convert from kilograms to grams, multiply the value in kilograms by 1000.
Working
Answer
4000
Walkthrough
The question asks us to convert a mass from kilograms to grams. The metric system is based on powers of 10. Specifically:
Therefore, to change 4 kg into grams, we multiply by 1000:
So, the mass is 4000 grams.
Key Takeaways
- Remember the standard metric prefixes: kilo- means .
- Converting from a larger unit (kg) to a smaller unit (g) involves multiplication.
Common Mistakes
- Dividing by 1000 instead of multiplying (which would give 0.004 g).
- Misplacing the decimal point.
Things to Be Careful About
- Ensure you are converting in the correct direction. Larger to smaller = multiply. Smaller to larger = divide.
Approach
Recall the relationship between cubic centimetres () and litres (L). There are 1000 cubic centimetres in 1 litre. To convert from to litres, divide the value in by 1000.
Working
Answer
0.25
Walkthrough
The question asks to convert a volume from cubic centimetres to litres. The standard conversion is:
To go from to litres, we divide by 1000:
Alternatively, as a fraction:
Both and are correct answers.
Key Takeaways
- Memorise that .
- Converting from a smaller unit () to a larger unit (litres) involves division.
Common Mistakes
- Multiplying by 1000 instead of dividing (which would give 250,000 litres).
- Confusing this with the linear conversion .
Things to Be Careful About
- This is a volume conversion, not length or area. Do not use or . Use .
In this question all dimensions are given in centimetres.
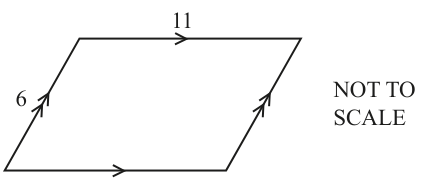
Approach
A parallelogram has two pairs of equal opposite sides. The diagram shows the top side is 11 cm and the left side is 6 cm. Therefore, the bottom side is also 11 cm and the right side is also 6 cm. The perimeter is the sum of all four side lengths.
Working
Answer
34
Walkthrough
The diagram shows a parallelogram with a top side of 11 cm and a left side of 6 cm. The arrows on the sides indicate that the top and bottom are parallel, and the left and right are parallel. By the properties of a parallelogram, opposite sides are equal in length. Therefore, the bottom side must be 11 cm and the right side must be 6 cm. The perimeter is the total distance around the outside of the shape, calculated by adding the lengths of all four sides: .
Key Takeaways
Opposite sides of a parallelogram are equal in length. The perimeter is the sum of the lengths of all outer boundary sides.
Common Mistakes
Adding only three sides, or assuming all four sides are equal (which would only be true for a rhombus). Forgetting to include both pairs of sides when calculating the perimeter.
Things to Be Careful About
The diagram is marked NOT TO SCALE, so do not attempt to measure lengths with a ruler. The units are centimetres, so the numerical answer is 34.
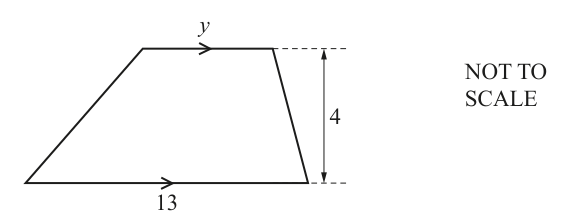
The diagram shows a trapezium.
The area of the trapezium is .
Find the value of .
= ______
Approach
The area of a trapezium is calculated using the formula , where and are the lengths of the parallel sides and is the perpendicular height. We are given the area , the parallel sides and , and the height . Substitute these values into the formula and solve for .
Working
Simplify the right side by calculating :
Divide both sides by 2:
Subtract 13 from both sides to isolate :
Answer
5
Walkthrough
We are given a trapezium with parallel horizontal sides of length and 13 cm. The perpendicular height between these parallel sides is given as 4 cm. The total area is 36 cm². The formula for the area of a trapezium is half the sum of the parallel lengths multiplied by the perpendicular height: . Substituting the known values gives the equation . We can simplify to 2, making the equation . Dividing both sides by 2 gives . Finally, subtracting 13 from 18 yields .
Key Takeaways
The area formula for a trapezium uses the two parallel sides and the perpendicular height between them. When a dimension is unknown, the area formula can be rearranged or solved as an algebraic equation.
Common Mistakes
Using the slanted side lengths instead of the parallel sides (though here only parallel sides are relevant). Using the rectangle area formula () instead. Forgetting to multiply the height by the average of the parallel sides.
Things to Be Careful About
The height must be the perpendicular distance between the parallel sides, which is explicitly given as 4. The diagram is NOT TO SCALE. The final answer is the value of , which is 5.
Jack uses number cards to make a 2-digit number.
Complete the missing card to give a 2-digit number that is not a prime number.
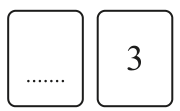
Approach
The second card is , so the 2-digit number has the form where is a non-zero digit. We need to be not prime (i.e. composite).
Working
A number ending in is odd, so it is not divisible by . To guarantee it is not prime, we can make it divisible by . A number is divisible by if the sum of its digits is a multiple of :
Since must be a non-zero digit to form a 2-digit number, . This gives the numbers:
Checking these:
Any of these is a valid completion.
Answer
33
Walkthrough
The problem asks for a missing digit that, when placed before , forms a 2-digit number that is not prime. Since the number ends in , it is odd and cannot be divisible by . The easiest way to ensure it is not prime is to make it divisible by .
A number is divisible by if the sum of its digits is a multiple of . Let the missing digit be . Then must be a multiple of , which means itself must be a multiple of . The non-zero digits that are multiples of are and . This gives the numbers and . None of these are prime because they are all multiples of greater than itself.
Key Takeaways
- A number ending in an odd digit is not divisible by .
- The divisibility rule for states that a number is divisible by if the sum of its digits is a multiple of .
- Any number greater than that is divisible by is composite (not prime).
Common Mistakes
- Choosing to give , which is not a valid 2-digit number.
- Choosing to give , which is prime.
- Choosing to give , which is prime.
- Forgetting that itself is prime, so the number must be greater than and have as a factor.
Things to Be Careful About
- The number must be a valid 2-digit number, so the first digit cannot be .
- The question asks for a number that is not prime, so any composite number ending in is acceptable. The mark scheme accepts or .
- Always check that the chosen number is indeed composite to avoid accidentally giving a prime number.
Mei says:
When I add two multiples of 3, the answer is always a multiple of 6.
Give an example to show that Mei is wrong.
______
Approach
To show Mei is wrong, we need a counterexample: two multiples of whose sum is not a multiple of . Mei's claim is that for any multiples and of , is a multiple of .
Working
Let the first multiple of be and the second be .
is a multiple of (), but it is not a multiple of ().
This counterexample disproves Mei's statement.
Answer
6 + 9 = 15
Walkthrough
Mei claims that adding any two multiples of always gives a multiple of . To show she is wrong, we only need to find one counterexample: two numbers that are both multiples of , but whose sum is not a multiple of .
Recall that multiples of are and multiples of are .
If we add two even multiples of (like and ), we get , which is a multiple of . This might make Mei's claim seem true. However, if we add an even multiple and an odd multiple (like and ), we get , which is not a multiple of .
Any pair of multiples of where one is an even multiple () and the other is an odd multiple () will give a sum that is not a multiple of .
Key Takeaways
- A counterexample to a universal statement requires only one valid instance that contradicts it.
- The sum of two multiples of is always a multiple of , but not necessarily a multiple of .
- Distinguishing between even and odd multiples is key to finding counterexamples in divisibility problems.
Common Mistakes
- Giving , which is a multiple of and does not disprove Mei's claim.
- Giving , which is also a multiple of .
- Forgetting to show the sum in the final answer; the mark scheme requires "Correct example showing sum and result".
- Choosing numbers that are not multiples of in the first place.
Things to Be Careful About
- The question asks to "Give an example to show that Mei is wrong", so the answer must explicitly show the two multiples, their sum, and indicate that the sum is not a multiple of .
- A simple statement like "" is incorrect because is a multiple of . Always verify that the sum is genuinely not a multiple of .
- The mark scheme accepts any valid counterexample, such as , (wait, 12 is multiple of 6, so bad), (bad), (valid).
Approach
To divide one fraction by another, multiply the first fraction by the reciprocal of the second fraction.
Working
Change division to multiplication and flip the second fraction:
Multiply the numerators together and the denominators together:
Answer
6/7
Walkthrough
When dividing fractions, the standard method is to keep the first fraction as it is, change the operation to multiplication, and then invert (flip) the second fraction. This is often remembered with the phrase "keep, change, flip".
Here, we start with . We keep it. We change the division sign () to a multiplication sign (). We flip to become its reciprocal, (which is just 3).
So the calculation becomes . To multiply fractions, you multiply the top numbers (numerators) together and the bottom numbers (denominators) together. The numerator becomes , and the denominator becomes . The result is .
Key Takeaways
- Division of fractions is performed by multiplying by the reciprocal of the divisor.
- The reciprocal of is .
- Multiplication of fractions is straightforward: .
Common Mistakes
- Dividing the numerators and denominators directly (e.g., and ), which is incorrect.
- Flipping the wrong fraction (flipping the first one instead of the second).
- Forgetting to change the operation from division to multiplication.
Things to Be Careful About
- Ensure the final fraction is in its simplest form if required. In this case, 6 and 7 share no common factors, so is already simplified.
- On Component 1 (Non-calculator), always show the reciprocal step clearly to secure method marks if available.
Approach
To add fractions with different denominators, find a common denominator (preferably the lowest common multiple), convert each fraction, add the numerators, and finally express the resulting improper fraction as a mixed number as requested.
Working
The expression is:
The denominators are 6 and 4. The lowest common multiple (LCM) of 6 and 4 is 12. Convert both fractions to have a denominator of 12.
For , multiply the numerator and denominator by 2:
For , multiply the numerator and denominator by 3:
Now add the two fractions:
The question asks for the answer as a mixed number. Divide the numerator by the denominator: goes in 1 time with a remainder of 7.
So, the whole number part is 1, and the fractional part is .
Answer
1 7/12
Walkthrough
First, look at the denominators: 6 and 4. We need to find a number that both 6 and 4 can divide into evenly. The multiples of 6 are 6, 12, 18... The multiples of 4 are 4, 8, 12, 16... The smallest common multiple is 12. This will be our common denominator.
Next, adjust the fractions so they have this new denominator. For , we must multiply the bottom by 2 to get 12. Whatever we do to the bottom, we must do to the top: . So, .
For , we must multiply the bottom by 3 to get 12. Do the same to the top: . So, .
Now that the denominators are the same, we can simply add the top numbers (numerators): . The denominator stays 12. This gives us the improper fraction .
Finally, the question asks for a mixed number. This means we need to see how many whole times 12 fits into 19. It fits 1 time (). We subtract 12 from 19 to find the remainder: . This remainder becomes the new numerator over the original denominator. Thus, .
Key Takeaways
- Always find a common denominator before adding or subtracting fractions.
- Using the Lowest Common Multiple (LCM) keeps the numbers smaller and easier to manage.
- An improper fraction (where the numerator is larger than the denominator) can be converted to a mixed number by performing integer division.
Common Mistakes
- Adding the denominators along with the numerators (e.g., ), which is mathematically invalid.
- Finding the product of the denominators (24) instead of the LCM (12). While using 24 works (), it requires an extra simplification step and increases the chance of arithmetic error.
- Forgetting to simplify the fractional part of the mixed number if it wasn't in simplest form (though is already simple here).
- Making an arithmetic error when converting the improper fraction back to a mixed number.
Things to Be Careful About
- The question explicitly requests a mixed number. Leaving the answer as may lose marks depending on the specific mark scheme instructions (often marked as "oe" but sometimes strict). Always check the required format.
- On Component 1 (Non-calculator), ensure you show the conversion to the common denominator clearly, as this earns the method mark (M1).
A train leaves station at 07 43.
The train arrives at station at 10 27.
Work out the time the train takes to travel from station to station .
______ hours ______ minutes
Approach
Subtract the departure time from the arrival time to find the duration.
Working
The train leaves at and arrives at .
First, calculate the number of full hours: from to would be hours. However, the arrival is at , which is before .
Alternatively, subtract the minutes first:
Since , we need to borrow hour ( minutes) from the hours column.
Convert the arrival time by borrowing hour from :
Now subtract the departure time ():
Hours:
Minutes:
So the time taken is hours and minutes.
Answer
2 hours 44 minutes
Walkthrough
To find the duration of the journey, we subtract the start time from the end time.
Start time:
End time:
We can perform this subtraction directly: Hours minus Hours, Minutes minus Minutes.
hours
minutes
Since we have negative minutes, it means we borrowed an hour. Specifically, hours is minutes. So the total duration in minutes is minutes. Converting back to hours and minutes: remainder . Thus, hours and minutes.
Or more simply, as shown in the working, borrow hour ( mins) from the hours. The becomes , and the minutes becomes minutes. Then hours and minutes.
Key Takeaways
When calculating time differences, if the ending minutes are less than the starting minutes, you must borrow minutes from the ending hours.
Common Mistakes
- Subtracting minutes directly () without adjusting for the negative result or borrowing.
- Forgetting that hour equals minutes, not minutes.
- Incorrectly calculating as instead of before realizing the minute adjustment is needed.
Things to Be Careful About
Ensure you are using the -hour clock correctly. The calculation involves base- arithmetic for minutes, not base-. Double-check your subtraction of minutes carefully.
A bus leaves the bus station at 06 25.
It arrives at the airport at 07 05.
The distance from the bus station to the airport is .
Calculate the average speed of the bus for this journey.
Give your answer in km/h.
______
Approach
Average speed is defined as Total Distance divided by Total Time. The distance is given in km, but the time is given in minutes. We must convert the time to hours to get the speed in km/h.
Working
-
Find the duration of the journey:
The bus leaves at and arrives at .
From to is minutes ().
From to is minutes.
Total time minutes. -
Convert time to hours:
There are minutes in hour.
-
Calculate average speed:
Given Distance .
To divide by a fraction, multiply by its reciprocal:
Answer
36 km/h
Walkthrough
First, determine how long the bus journey took. The bus left at and arrived at .
Counting forward: from to is exactly one hour ( mins). Since it arrived at , which is minutes earlier than , the time taken is minutes. Alternatively, to is mins, plus mins to , totaling mins.
Next, use the formula . The distance is km. The time is minutes. Since the required unit is km/h, convert minutes to hours by dividing by . So, time hours.
Finally, calculate the speed: .
Key Takeaways
Always check units. If distance is in km and time is in minutes, convert time to hours first to get km/h. Dividing by a fraction is equivalent to multiplying by its reciprocal.
Common Mistakes
- Dividing distance by minutes directly () and forgetting to scale to an hour.
- Incorrectly calculating the time difference (e.g., thinking is seconds or miscalculating the minutes).
- Arithmetic errors when dividing by a fraction.
Things to Be Careful About
The mark scheme accepts M1 for showing the setup, and M2 for the final correct conversion/division by . Ensure you explicitly show the division by or the conversion of mins to hours to secure all method marks.
There are red pens, blue pens and black pens in a box.
There are red pens.
The number of blue pens is 5 more than the number of red pens.
The number of black pens is 2 times the number of blue pens.
Write an expression, in terms of , for the total number of pens in the box.
Give your expression in its simplest form.
______
Approach
We are given the number of red pens as . We must express the number of blue and black pens in terms of , sum them to find the total, and simplify.
Working
-
Red pens: The problem states there are red pens.
-
Blue pens: The number of blue pens is 5 more than the number of red pens.
-
Black pens: The number of black pens is 2 times the number of blue pens.
Expand this expression:
-
Total number of pens: Add the expressions for red, blue, and black pens.
-
Simplify: Combine like terms ( terms together and constant terms together).
Answer
4x + 15
Walkthrough
The question asks us to build an algebraic expression based on relationships between different items.
First, we identify the base quantity: the number of red pens is defined directly as .
Next, we translate the relationship for blue pens. "5 more than the number of red pens" means we take the number of red pens () and add 5 to it. So, Blue .
Then, we handle the black pens. The text says the number of black pens is "2 times the number of blue pens". It is crucial to use the expression for blue pens here, not just . So, Black . When we expand this bracket, we get . A common mistake is to write , which would mean adding 5 after doubling the red pens, rather than doubling the quantity that is already 5 more than the red pens.
Finally, we find the total by adding all three groups together: Red + Blue + Black. This gives . Grouping the 's gives . Grouping the numbers gives . The final simplified expression is .
Key Takeaways
- When defining variables based on word problems, always start with the one given directly.
- Pay close attention to phrases like "2 times the number of...". If that number is itself an expression (like ), you must put brackets around it before multiplying.
- Simplifying the final answer involves collecting like terms (variables with variables, constants with constants).
Common Mistakes
- Forgetting to expand correctly as . Writing is a frequent error.
- Adding only two types of pens instead of all three.
- Not simplifying the final expression (e.g., leaving it as ).
Things to Be Careful About
- Ensure the final expression is in its simplest form. The mark scheme awards marks for the correct expansion step () but requires the final combined answer ().
The total number of pens in the box is 27.
Find the number of red pens in the box.
______
Approach
We use the expression derived in part (a) for the total number of pens and set it equal to the given total (27). Then we solve the resulting linear equation for .
Working
-
Set up the equation: From part (a), Total . We are told the total number of pens is 27.
-
Isolate the term with : Subtract 15 from both sides of the equation.
-
Solve for : Divide both sides by 4.
Since represents the number of red pens, the number of red pens is 3.
Answer
3
Walkthrough
This part builds directly on the work done in part (a). We now have a specific value for the total number of pens, so we can turn our expression into an equation.
Equation: .
To solve for , we need to get by itself. First, we remove the constant term added to the term. Since 15 is added to , we subtract 15 from both sides. is 12, so we have .
Next, since is multiplied by 4, we divide both sides by 4 to isolate . equals 3. So, .
Because was defined as the number of red pens, the answer to the question "Find the number of red pens" is 3.
Key Takeaways
- Parts of multi-part questions often depend on each other. Always check if you need to use a result from a previous part.
- Solving linear equations follows a reverse order of operations: undo addition/subtraction first, then multiplication/division.
Common Mistakes
- Arithmetic errors when subtracting 15 from 27.
- Dividing by the wrong number or forgetting to divide the constant side (though here the RHS is just a number, so this mainly applies if the equation were more complex).
- Stopping at without stating what it represents if the question asked for a specific item count (though here the final answer box just needs the number).
Things to Be Careful About
- The question asks for the "number of red pens", which corresponds to . Make sure you don't calculate the number of blue or black pens unless asked. The mark scheme awards the method mark for setting up and solving for .
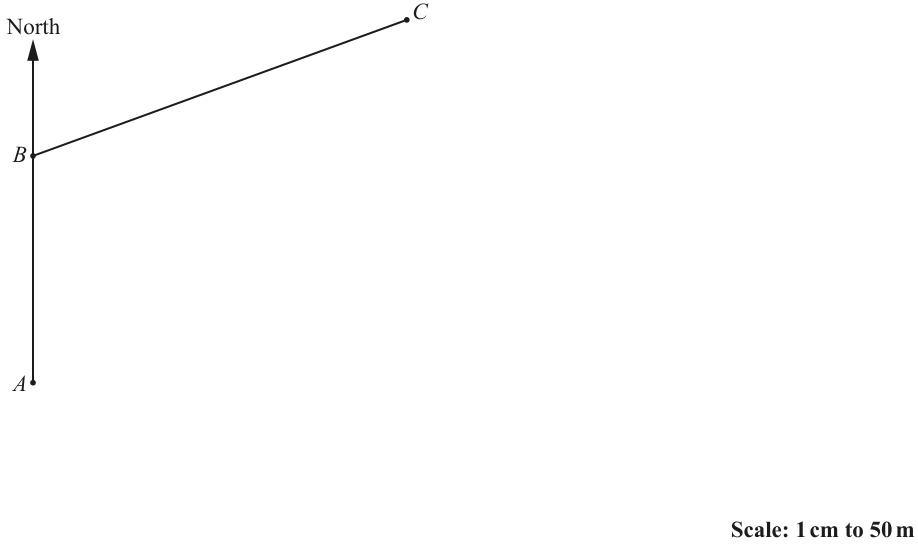
The scale drawing shows part of a field, .
The scale is to .
Approach
The bearing of a point is measured clockwise from the North line at the point of observation to the target point.
Working
Using a protractor, measure the angle clockwise from the North arrow at to the line segment .
The mark scheme accepts any value from to .
Answer
070° (any value from 068° to 072°)
070°
Walkthrough
A bearing is always measured as an angle in degrees, measured clockwise from the North direction. Here, the point of observation is and the target is . The North arrow at points vertically upwards. Placing a protractor with its centre at and its line along the North arrow, we read the angle clockwise to the line . The measured angle falls between and . Any value in this range is accepted.
Key Takeaways
- Bearings are always three-figure angles measured clockwise from North.
- When measuring from a diagram, small variations due to drawing or measurement tolerance are accepted within the mark scheme range.
Common Mistakes
- Measuring the angle anticlockwise instead of clockwise.
- Measuring from to instead of to .
- Giving the answer as without the degree symbol or as a two-figure angle like instead of .
Things to Be Careful About
- Always measure clockwise from the North line at the point of observation.
- Bearings must be given as three figures (e.g., , not ).
- The tolerance range to reflects normal measurement error on a printed diagram.
is from and from .
Use a ruler and compasses only to complete the scale drawing of the field .
Approach
Convert the real-world distances to scale distances using the given scale of to . Then use compasses to draw arcs from and to locate point .
Working
Scale:
Distance
Distance
- Place the compass point at and draw an arc with radius .
- Place the compass point at and draw an arc with radius .
- Mark the intersection of these two arcs as point .
- Join to and to with straight lines to complete the quadrilateral .
Answer
Point is located at the intersection of a arc from and a arc from , completing the scale drawing of .
Point D at intersection of 5 cm arc from C and 6 cm arc from A
Walkthrough
The question asks to complete a scale drawing. First, convert the real distances to the drawing scale. The scale is to , so divide the real distance by to get the length in centimetres. becomes and becomes . Point must be from and from . Using a compass, draw an arc of radius centred at and an arc of radius centred at . The point where these arcs intersect (on the correct side to form a convex quadrilateral) is point . Join to and to to finish the field.
Key Takeaways
- Always convert real measurements to scale measurements before drawing.
- A point at a fixed distance from a known point lies on an arc (part of a circle) centred at that point.
- Intersecting arcs locate a point that satisfies two distance conditions simultaneously.
Common Mistakes
- Forgetting to convert real distances to scale distances (e.g., drawing a arc).
- Drawing the arcs on the wrong side, resulting in a crossed or non-convex quadrilateral.
- Not showing the construction arcs, which are required for the method marks.
Things to Be Careful About
- The question specifies "ruler and compasses only", so no protractor or measuring ruler is allowed for the construction.
- The construction arcs must be visible on the final drawing to earn the method marks.
- Ensure the intersection point is chosen so that forms a proper quadrilateral matching the layout of the field.
There is a path across the field.
The path is equidistant from and .
Use a straight edge and compasses only to construct the path.
Approach
A path equidistant from two lines and lies on the angle bisector of the angle between them. Construct the angle bisector of .
Working
- Place the compass point at and draw an arc that intersects both and . Let these intersection points be and .
- Place the compass point at and draw an arc in the interior of .
- Without changing the compass width, place the compass point at and draw another arc that intersects the first arc. Let this intersection be .
- Use a straight edge to draw a line from through . This line is the required path.
Answer
The angle bisector of is constructed using compasses and a straight edge.
Angle bisector of angle ABC
Walkthrough
The set of points equidistant from two intersecting lines is the angle bisector of the angle between them. Here, the lines are and , meeting at . To construct the bisector of :
- First, draw an arc centred at that cuts both and . This establishes two points ( and ) that are equidistant from .
- Next, from and , draw arcs of equal radius that intersect inside the angle. The intersection point is equidistant from and , and therefore lies on the bisector.
- Finally, draw a straight line from through . This line is the locus of points equidistant from and , representing the path.
Key Takeaways
- The angle bisector is the locus of points equidistant from two intersecting lines.
- The standard construction uses an initial arc from the vertex to create two reference points, then equal arcs from those points to find a point on the bisector.
Common Mistakes
- Drawing the arcs from and with different radii.
- Forgetting to show the construction arcs, which are required for the method marks.
- Drawing the bisector of the wrong angle (e.g., the exterior angle at ).
Things to Be Careful About
- The question specifies "straight edge and compasses only", so no protractor is allowed.
- The construction arcs must be clearly visible on the final drawing to earn the marks.
- The line must be drawn from through the intersection of the arcs, extending across the field.
By writing each number correct to 1 significant figure, estimate the value of
______
Approach
To estimate the value, we first round each number in the expression to 1 significant figure. Then we perform the arithmetic operations with these rounded values.
Working
The expression is:
Step 1: Round each number to 1 significant figure.
- rounds to (the first digit is 5, the next is 3 which is less than 5).
- rounds to (the first digit is 3, the next is 9 which is 5 or more, so we round up).
- rounds to (the first digit is 8, the next is 7 which is 5 or more, so we round up to the nearest hundred).
Step 2: Substitute the rounded values into the expression.
Step 3: Evaluate the numerator and denominator.
Numerator:
Denominator:
So the expression becomes:
Step 4: Simplify the fraction.
Divide numerator and denominator by their greatest common divisor, which is 3:
Convert to decimal if desired:
Answer
0.3
Walkthrough
The problem asks for an estimate of a specific calculation by rounding the input numbers to 1 significant figure first. This is a standard estimation technique used to quickly check the reasonableness of a precise answer or to solve problems where exact precision isn't required.
- Rounding : The first significant figure is the 5. The next digit is 3. Since 3 is less than 5, we do not round up. So, .
- Rounding : The first significant figure is the 3. The next digit is 9. Since 9 is 5 or greater, we round up the 3 to 4. So, .
- Rounding : The first significant figure is the 8. The next digit is 7. Since 7 is 5 or greater, we round up the 8 to 9, but because it's in the hundreds place, the number becomes 900. So, .
- Substitution: We replace the original numbers with these approximations: .
- Calculation:
- The numerator is simply .
- The denominator involves a square root. We know that , so .
- The fraction is now .
- Simplification: Both 9 and 30 are divisible by 3. and . Thus, the fraction simplifies to , which is equal to .
Key Takeaways
- Significant Figures: When rounding to 1 significant figure, look at the first non-zero digit. If the next digit is 5 or more, round up; otherwise, keep it as is.
- Estimation Strategy: Rounding intermediate steps makes mental math much easier. For example, is a perfect square, whereas is not.
- Order of Operations: Ensure you evaluate the numerator and denominator separately before dividing.
Common Mistakes
- Incorrect Rounding: Rounding to instead of , or to instead of . The mark scheme awards partial credit (B1) if two of the three rounded values () are correct.
- Forgetting the Square Root: Calculating or similar errors by ignoring the radical sign.
- Arithmetic Errors: Making a mistake in adding or simplifying .
- Decimal Place vs Significant Figure: Confusing rounding to 1 decimal place (which would give ) with 1 significant figure.
Things to Be Careful About
- Accuracy of Rounding: Be very careful with digits like 9. rounds to , not . rounds to , not .
- Final Form: The question asks for an estimate. Usually, a decimal or simplified fraction is expected. and are both acceptable.
- Component Type: This is a Non-calculator paper. While estimation is the goal, the chosen rounded numbers () are specifically selected to be easy to compute without a calculator (perfect square). Always choose rounded values that facilitate manual calculation.
Approach
We are given the formula and asked to find when . We will substitute for in the expression.
Working
Perform the multiplication first:
Now add 7:
Answer
-3
Walkthrough
The problem asks us to evaluate the variable using the formula . We are told that . The first step is to replace every instance of in the formula with . This gives us . Following the order of operations (BODMAS/PEMDAS), we perform the multiplication before addition. Multiplying 5 by -2 gives -10. Finally, we add 7 to -10, which results in -3.
Key Takeaways
When substituting negative numbers into algebraic expressions, always use parentheses to ensure the sign is correctly applied during multiplication or other operations. Remember that multiplying a positive number by a negative number yields a negative result.
Common Mistakes
Forgetting that is negative, resulting in . Another common error is adding 7 before multiplying, though the order of operations prevents this naturally.
Things to Be Careful About
Ensure you handle the negative sign correctly. means multiplied by , not minus .
Approach
We start with the formula and need to rearrange it so that is the subject. This involves isolating on one side of the equation.
Working
First, eliminate the constant term from the right-hand side by adding 9 to both sides:
Next, divide both sides by 4 to isolate :
So,
Answer
(c + 9)/4
Walkthrough
To make the subject of the formula , we need to perform inverse operations to get by itself. The term involving is , which has 9 subtracted from it. First, we undo the subtraction of 9 by adding 9 to both sides of the equation, giving . Now, is multiplied by 4. To undo this, we divide both sides by 4. This leaves on one side and on the other. Thus, .
Key Takeaways
When rearranging formulas, treat the equation as a balance. Whatever operation you do to one side, you must do to the other. Work backwards through the order of operations: undo addition/subtraction first, then multiplication/division.
Common Mistakes
Only adding 9 but forgetting to divide by 4, or only dividing by 4 but forgetting to add 9. Also, writing instead of is incorrect because the division applies to the entire left side ().
Things to Be Careful About
Ensure the final answer clearly shows that the entire quantity is divided by 4. Using fraction notation like avoids ambiguity compared to writing .
Kamal records the number of phone calls he receives at work each day for 20 days.
The results are shown in the table.
| Number of phone calls | 0 to 5 | 6 to 10 | 11 to 15 | 16 or more |
|---|---|---|---|---|
| Frequency | 9 | 5 | 4 | 2 |
Find the relative frequency of Kamal receiving 0 to 5 phone calls at work in one day.
______
Approach
The relative frequency of an event is calculated as the frequency of that event divided by the total number of observations.
Working
From the table:
- The frequency of receiving 0 to 5 phone calls is .
- The total number of days recorded is (sum of frequencies: ).
The relative frequency is:
Answer
9/20
Walkthrough
Relative frequency is essentially the experimental probability based on the data collected. To find it for the category "0 to 5 phone calls", we take the count of days where this happened () and divide it by the total number of days in the study (). This gives the fraction . This fraction cannot be simplified further as 9 and 20 share no common factors other than 1.
Key Takeaways
- Relative Frequency = .
- Always verify the total number of trials if it is not explicitly stated, although here it is given as 20 days.
Common Mistakes
- Writing the frequency () instead of the relative frequency.
- Inverting the fraction (writing ).
- Attempting to convert to a decimal incorrectly or rounding unnecessarily when the mark scheme accepts exact forms like fractions.
Things to Be Careful About
- The mark scheme allows "oe" (or equivalent), so decimals like are also correct, but the fractional form is the most direct representation.
Kamal works for 160 days.
Find the number of these days Kamal would expect to receive 11 or more phone calls at work.
______
Approach
First, determine the relative frequency of receiving 11 or more phone calls based on the 20-day record. Then, multiply this relative frequency by the new total number of working days (160) to estimate the expected number of days.
Working
-
Identify the days with 11 or more phone calls from the table:
- "11 to 15": Frequency is .
- "16 or more": Frequency is .
- Total days with 11 or more calls = .
-
Calculate the relative frequency for 11 or more calls:
- Predict the number of days for 160 days:
Calculate the value:
Alternatively, using the method shown in the mark scheme:
Answer
48
Walkthrough
The question asks for an expectation over a larger period (160 days) based on the pattern observed in a smaller sample (20 days).
Step 1: Find the relevant frequency. We need "11 or more". Looking at the table, this covers two groups: "11 to 15" (frequency 4) and "16 or more" (frequency 2). We add these together: days.
Step 2: Find the proportion. Out of the original 20 days, 6 had 11 or more calls. So the proportion is .
Step 3: Scale up. If Kamal works 160 days, we apply this proportion to 160. Calculation: . It is easier to divide 160 by 20 first () and then multiply by 6 ().
Key Takeaways
- Expected Frequency = Relative Frequency New Total Number of Trials.
- When a condition spans multiple categories (e.g., "11 or more"), you must sum the frequencies of all applicable categories before calculating the relative frequency.
Common Mistakes
- Only using one of the categories (e.g., only counting "11 to 15") and forgetting the "16 or more" group.
- Multiplying the raw frequency (6) by 160 instead of the relative frequency ().
- Arithmetic errors when scaling the fraction.
Things to Be Careful About
- Ensure you read the boundary correctly: "11 or more" includes 11. The category "11 to 15" starts at 11, so it is included. The previous category "6 to 10" ends at 10, so it is excluded.
- The mark scheme awards a method mark (M1) for setting up the multiplication correctly, such as or finding the multiplier and multiplying by the count .
Approach
Standard form is written as , where and is an integer.
Working
We start with . To get a value between 1 and 10, we place the decimal point after the first digit:
To return to the original number, we must multiply by 10 seven times (since there are 7 digits to the right of the decimal point):
Answer
4.2 x 10^7
Walkthrough
Standard form requires us to express a number as .
- Identify : Move the decimal point in so that it sits between the 4 and the 2. This gives . This satisfies the condition .
- Identify : Count how many places the decimal point moved from its original position at the end of the number to its new position. It moved 7 places to the left. Since the original number () is much larger than 1, the exponent is positive. Thus, .
- Combine: Write the result as .
Key Takeaways
- Standard form always starts with a number between 1 and 10.
- For numbers greater than 1, the power of 10 is positive and equals the number of digits minus one (or the number of places the decimal moves left).
Common Mistakes
- Writing : The coefficient 42 is not between 1 and 10.
- Writing : The coefficient 0.42 is less than 1.
- Getting the sign of the exponent wrong (e.g., ).
Things to Be Careful About
- Ensure the final answer is in strict standard form ().
Approach
To add two numbers in standard form, their powers of 10 must be the same. We convert one term to match the other, add the coefficients, and then adjust the result back to standard form if necessary.
Working
The expression is .
It is easier to convert the term with the higher power () down to the lower power (), or vice versa. Let's convert both to :
For the second term:
Now add the coefficients:
This is not yet in standard form because . We adjust it by moving the decimal point one place to the left (dividing the coefficient by 10) and increasing the exponent by 1:
Alternatively, converting to decimals:
Convert to standard form:
Answer
7.53 x 10^-3
Walkthrough
When adding or subtracting numbers in standard form, you cannot simply add the coefficients unless the powers of 10 are identical.
- Align the exponents: Choose one of the powers (either or ) and rewrite the other term to use that power. Here, changing to makes the powers match.
- Add the coefficients: Now that both terms have , we can add and directly to get .
- Check standard form: The intermediate result is . Since is not between 1 and 10, we must shift the decimal point. Moving it one place left () requires multiplying by 10, which means we divide the power of 10 by 10 (increase the exponent by 1: ).
Key Takeaways
- Powers of 10 must be equal before adding or subtracting coefficients.
- Adjusting the final answer often involves shifting the decimal point and compensating with the exponent.
Common Mistakes
- Adding coefficients directly: , leading to or similar incorrect answers.
- Subtracting exponents incorrectly.
- Failing to convert the final sum back to proper standard form (e.g., leaving it as ).
Things to Be Careful About
- Pay attention to negative exponents. is larger than , so is actually ten times larger than .
- When converting to , ensure the direction of the exponent change matches the direction of the decimal shift.
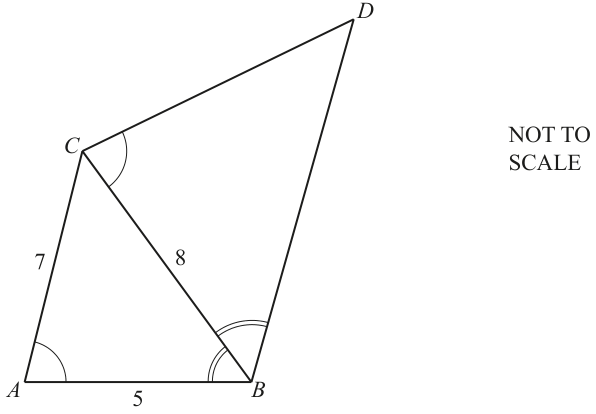
Triangle is mathematically similar to triangle .
, and .
Calculate .
= ______
Approach
Triangle ABC is mathematically similar to triangle CBD. The order of the vertices in the similarity statement tells us which sides correspond to each other. We use this correspondence to set up a proportion involving the known side lengths and the unknown length BD.
Working
The similarity statement is . This gives the following correspondence of sides:
- corresponds to
- corresponds to
- corresponds to
We can write the ratio of corresponding sides as:
Substitute the given values , , and :
Cross-multiply to solve for :
Answer
12.8
Walkthrough
The problem states that triangle ABC is mathematically similar to triangle CBD. In a similarity statement, the order of the vertices is crucial because it indicates which angles are equal and which sides are corresponding. Here, corresponds to , corresponds to , and corresponds to .
This means side (the first two letters) corresponds to side (the first two letters of the second triangle). Similarly, side (the last two letters) corresponds to side (the last two letters of the second triangle).
We are given:
- cm
- cm
- cm
Since is the same as , we have cm. We want to find . Using the ratio of corresponding sides:
Substituting the known values:
To solve for , we cross-multiply:
Dividing both sides by 5:
Key Takeaways
- The order of vertices in a similarity statement (e.g., ) determines the correspondence of sides. Side corresponds to , to , and to .
- When two triangles are similar, the ratio of any pair of corresponding sides is equal to the scale factor.
- Cross-multiplication is a reliable method to solve proportions for an unknown length.
Common Mistakes
- Incorrect correspondence: Matching sides incorrectly, such as using , which ignores the vertex order in the similarity statement. Always read the similarity statement letter by letter to find corresponding sides.
- Using the wrong side: Forgetting that is the same length as (8 cm) and trying to use an unknown side like .
- Arithmetic errors: Multiplying incorrectly or dividing 64 by 5 incorrectly.
Things to Be Careful About
- Vertex order: The similarity statement must be read carefully. corresponds to , not or .
- Units: Ensure all lengths are in the same unit (cm) before setting up the ratio. Here they are all in cm, so no conversion is needed.
- Exact form: The answer can be given as a decimal () or an exact fraction (). Both are acceptable.
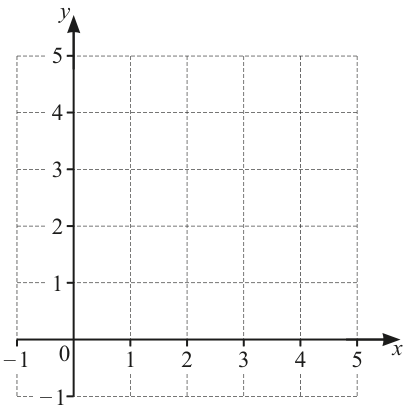
The region is defined by these inequalities.
Find and label region .
Approach
Graph each inequality by first drawing its boundary line, then testing a point to decide which side of the line to keep. The region is where all three conditions are satisfied simultaneously.
Working
The three boundary lines are:
- : passes through , , .
- : passes through , , .
- : the -axis.
For , test : is true, so the region is above (or to the left of) .
For , test : is true, so the region is below (or to the left of) .
For , the region is to the right of the -axis.
The three lines intersect at:
The common region is the triangle with vertices , , and .
Answer
Region is the triangle bounded by the -axis (), the line , and the line , with vertices at , , and .
Region R is the triangle with vertices (0, 0), (0, 4), and (4/3, 8/3), bounded by the y-axis, the line y = 2x, and the line x + y = 4.
Walkthrough
First, convert each inequality into an equation to find the boundary lines. The line goes through the origin and has gradient 2, so plot , , and . The line has intercepts and , so plot those two points and draw the line. The third boundary is , which is simply the -axis.
Next, decide which side of each line satisfies the inequality. For , pick a test point not on the line, such as . Since is true, the correct side is above the line . For , test : is true, so the correct side is below the line . For , the correct side is to the right of the -axis.
Finally, find the vertices of the region by solving pairs of boundary equations. The intersection of and is . The intersection of and is . The intersection of and is found by substituting: , giving and . Shade the triangular region with these three vertices and label it .
Key Takeaways
- Graphing inequality regions requires drawing boundary lines and testing which side satisfies each inequality.
- The region satisfying multiple inequalities is the intersection of the individual half-planes.
- Vertices of the region are found by solving pairs of boundary equations simultaneously.
Common Mistakes
- Drawing the boundary lines with the wrong gradient or intercepts.
- Choosing the wrong side of a boundary line when testing a point.
- Forgetting to include the -axis () as a boundary line.
- Not shading the final region or labelling it .
Things to Be Careful About
- The boundary lines are drawn solid because all inequalities are or (not strict).
- The region must be shaded and clearly labelled .
- On the non-calculator component, the intersection point should be calculated exactly by hand, not estimated from the grid.
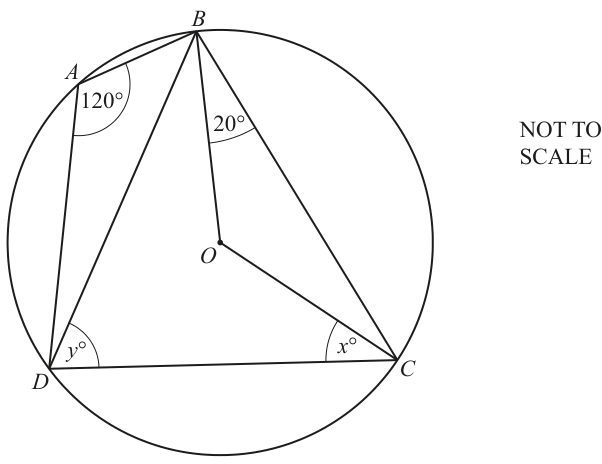
and are points on a circle, centre .
Angle and angle .
Approach
Use the property that opposite angles in a cyclic quadrilateral sum to to find . Then, recognise that is isosceles because and are radii, giving . Finally, subtract from to find .
Working
Since is a cyclic quadrilateral, its opposite angles sum to :
Substitute the given value :
In , the sides and are both radii of the circle, so . This makes an isosceles triangle, and the base angles are equal:
From the diagram, represents , which is the difference between and :
Answer
40
Walkthrough
First, we identify that is a cyclic quadrilateral because all four vertices lie on the circle. A key circle theorem states that opposite angles in a cyclic quadrilateral are supplementary (sum to ). Using , we calculate . Next, we look at . Since is the centre and are on the circle, and are radii and therefore equal in length. This makes isosceles, so the base angles and are equal. Given , we have . The angle in the diagram is , which is found by subtracting from the total angle : .
Key Takeaways
- Opposite angles in a cyclic quadrilateral always sum to .
- Radii of the same circle are equal, creating isosceles triangles when connected to points on the circumference.
- Always read the diagram carefully to ensure you are calculating the correct sub-angle (here, is , not the whole ).
Common Mistakes
- Assuming is the entire angle and answering instead of .
- Forgetting that and not using the isosceles triangle property to find .
- Adding to instead of subtracting it.
Things to Be Careful About
- The diagram is marked NOT TO SCALE, so do not estimate angles visually; rely only on theorems and given values.
- Ensure you distinguish between the full angle and the sub-angle labelled as .
Approach
Find the angle at the centre, , using the angle sum in . Then apply the theorem that the angle subtended by an arc at the centre is twice the angle subtended at any point on the remaining part of the circumference to find .
Working
In , the sum of angles is . We already know and :
The angle subtended by arc at the centre is . The angle subtended by the same arc at point on the circumference is (labelled in the diagram).
By the angle at centre theorem:
Answer
70
Walkthrough
First, we calculate the central angle . In , we know two angles are each (since it is isosceles with radii and ). The angle sum of a triangle is , so . Next, we use the angle at centre theorem, which states that the angle subtended by an arc at the centre is twice the angle subtended at any point on the circumference on the same side of the arc. Arc subtends at the centre and (labelled ) at point . Therefore, .
Key Takeaways
- The angle at the centre of a circle is twice any angle at the circumference subtended by the same arc.
- Always verify that the angles at the centre and circumference are subtended by the same arc and are on the same side of it.
Common Mistakes
- Forgetting to halve the central angle (answering instead of ).
- Using the wrong arc or misidentifying which angle at the circumference corresponds to the central angle.
- Incorrectly calculating (e.g., , forgetting to subtract both base angles).
Things to Be Careful About
- Ensure is indeed and not the full angle ; the diagram labels the angle between and as .
- The theorem only applies when the angles subtend the same arc and are on the same side; here, is on the major arc , matching the minor central angle .
Approach
Use the laws of indices to rewrite the expression with a positive exponent, then evaluate the cube root.
Working
The negative index law states that . Applying this:
The fractional exponent represents the cube root. We know that , so:
Substituting this back into the fraction:
This can also be written as the decimal .
Answer
1/5
Walkthrough
First, we address the negative exponent. A negative power indicates the reciprocal of the base raised to the positive version of that power. So, becomes . Next, we interpret the fractional exponent. An exponent of means we take the cube root of the number. Since , the cube root of is . Finally, we place this result in the denominator to get .
Key Takeaways
- Negative indices mean "take the reciprocal" ().
- Fractional exponents represent roots ().
- Perfect cubes like , , and are common values to memorize for Paper 1.
Common Mistakes
- Forgetting to invert the base when dealing with the negative index (writing instead of ).
- Calculating or instead of applying index laws.
- Confusing square roots with cube roots.
Things to Be Careful About
- Ensure you recognize that is a perfect cube. If it weren't, the answer might need to stay in surd form or standard form depending on the question context, but here an exact integer root exists.
- The mark scheme accepts or . Both are correct.
Approach
Simplify the algebraic fraction inside the parentheses first, then apply the outer fractional exponent to the result.
Working
The expression is .
First, simplify the term inside the bracket. We can cancel one from the numerator and denominator:
Now substitute this back into the original expression:
Apply the outer exponent to both the numerator and the denominator. Recall that :
Evaluate the numerator using the power of a power rule :
Evaluate the denominator. The exponent means square root cubed:
Combine the results:
Answer
a^3/8
Walkthrough
Step 1 is to look inside the brackets. The fraction contains like terms in . We subtract the powers () to simplify it to . This makes the next step much easier.
Step 2 is to distribute the outer exponent to both the top and bottom. It is crucial not to distribute it only to the or only to the .
For the numerator , raising it to the power of involves multiplying the exponents: . So we get .
For the denominator , raising it to the power of means taking the square root first () and then cubing the result (). Alternatively, you could cube it first () and then take the square root (). The former is usually arithmetically simpler.
Finally, combine them to get .
Key Takeaways
- Always simplify inside brackets before applying external powers if possible.
- When applying a power to a quotient, apply it to both numerator and denominator.
- Algebraic indices follow the same rules as numerical indices: multiply powers when raising a power to a power.
Common Mistakes
- Distributing the exponent incorrectly, e.g., writing without squaring the first, or writing .
- Simplifying incorrectly as (forgetting to cancel the ).
- Evaluating as (multiplying instead of rooting/cubing).
Things to Be Careful About
- The mark scheme awards partial credit (M1) for seeing intermediate steps like or derived from valid methods. Ensure your working clearly shows the transition from the unsimplified bracket to the final answer.
- Do not leave the answer as ; simplify fully to integers where possible.
The mass of a bag of almonds is , correct to the nearest gram.
Write down the lower bound of the mass of the bag of almonds.
______
Approach
The mass is given as , correct to the nearest gram. The unit of rounding is . To find the lower bound, we subtract half of this unit from the given value.
Working
Answer
124.5
Walkthrough
When a number is rounded to the nearest integer (gram), the actual value lies within an interval centered on that integer. The distance from the integer to either end of the interval is half the unit of rounding. Since the unit is , half the unit is . The lower bound is found by moving down by from the stated value of . Therefore, the lower bound is .
Key Takeaways
- For a value rounded to the nearest unit , the maximum error is .
- Lower Bound = Stated Value - .
- Upper Bound = Stated Value + .
Common Mistakes
- Subtracting or adding the full unit () instead of half the unit ().
- Confusing lower and upper bounds (adding instead of subtracting).
- Failing to include the decimal point in the answer when the result is not an integer.
Things to Be Careful About
- Ensure you identify the correct unit of rounding. Here it is 'nearest gram', so . If it were 'nearest 10 grams', .
- The answer must be exact; do not round further.
The mass of a large box is , correct to the nearest 10 grams.
The mass of a small box is , correct to the nearest 10 grams.
Calculate the upper bound of the difference between the mass of a large box and the mass of a small box.
______
Approach
We need to calculate the upper bound of the difference: . To maximize this difference, we must use the largest possible value for the large box and the smallest possible value for the small box.
So, we need:
- Upper Bound of Large Box Mass ()
- Lower Bound of Small Box Mass ()
Then, calculate .
Working
Step 1: Find the bounds for the large box.
The mass is , correct to the nearest . The unit of rounding is .
Half the unit is .
Step 2: Find the bounds for the small box.
The mass is , correct to the nearest . The unit of rounding is .
Half the unit is .
Step 3: Calculate the upper bound of the difference.
To get the greatest possible difference, subtract the smallest possible small box mass from the largest possible large box mass.
Answer
260
Walkthrough
To find the upper bound of a difference (), we want the result to be as large as possible. This happens when is as large as it can be and is as small as it can be.
First, determine the bounds for the large box. It is rounded to the nearest . The range is , so the upper bound is .
Next, determine the bounds for the small box. It is rounded to the nearest . The range is , so the lower bound is .
Finally, subtract the lower bound of the small box from the upper bound of the large box: .
Key Takeaways
- When finding the maximum of a sum (), add the upper bounds ().
- When finding the maximum of a difference (), subtract the lower bound of the subtrahend from the upper bound of the minuend ().
- When finding the minimum of a difference (), subtract the upper bound of the subtrahend from the lower bound of the minuend ().
Common Mistakes
- Subtracting the upper bound of the small box from the upper bound of the large box (). This gives the most likely difference or the difference of midpoints, not the maximum possible difference.
- Adding the bounds instead of subtracting them.
- Using the wrong unit of rounding (e.g., using 1 instead of 10).
- Arithmetic errors in subtraction.
Things to Be Careful About
- Always check the unit of rounding carefully (nearest 10 vs nearest 1).
- Remember that 'nfww' (no follow through wrong way) applies here, meaning if you calculated the bounds incorrectly earlier, you won't get marks for the subtraction unless the logic was correct but the arithmetic flawed (though typically M marks are lost for wrong bounds). The mark scheme specifically looks for seeing and .
Approach
To find the inverse function , we treat the original function as an equation in terms of , swap the variables and , and then solve the new equation for .
Working
Given:
Step 1: Replace with .
Step 2: Swap and . This reflects the relationship across the line .
Step 3: Rearrange to make the subject.
Multiply both sides by 5:
Add to both sides and subtract from both sides (or simply isolate the term with ):
Divide by 4:
Step 4: Write the final answer in function notation.
Answer
(2 - 5x)/4
Walkthrough
Finding the inverse of a function involves reversing the operation. If takes an input and produces an output , then takes that output and returns the original input . Algebraically, we represent this by setting , swapping the roles of and , and solving for the new .
First, we write . To find the inverse relation, we swap and , giving . Now we must isolate . We start by clearing the denominator by multiplying both sides by 5, which gives . Next, we move the term to the left side and the term to the right side to get . Finally, dividing by 4 yields . Replacing with gives the final result.
Key Takeaways
- The standard algorithm for finding an inverse is: set , swap and , solve for .
- Swapping variables effectively finds the reflection of the graph across the line .
- For linear functions, the inverse is also a linear function.
Common Mistakes
- Forgetting to swap and at the start.
- Making sign errors when rearranging, such as writing instead of (though mathematically equivalent, the form matters for specific mark schemes).
- Dividing only part of the expression instead of the whole numerator.
Things to Be Careful About
- Ensure you are solving for the variable you just swapped in. A common error is to stop after swapping or to try to simplify the fraction before isolating .
- The mark scheme accepts variations like , so be comfortable expanding brackets if needed.
Approach
We need to evaluate the expression . First, determine what means by substituting wherever appears in the original function definition. Then, subtract the result from and simplify.
Working
Original function:
Find : Substitute for :
Now calculate :
Since the denominators are the same, combine the numerators. Be careful with the subtraction sign applying to the entire second numerator:
Expand the brackets in the numerator:
Group like terms ( and ):
Answer
4x/5
Walkthrough
The problem asks us to simplify the difference between the function evaluated at and the function evaluated at .
First, we find . The rule for is "take the input, multiply it by 4, subtract that from 2, and divide by 5". So if the input is , we do: , then divide by 5. Thus .
Next, we subtract this from . Since they share the same denominator (5), we can subtract the numerators directly. Crucially, because we are subtracting the whole fraction , we must place parentheses around the numerator of or distribute the negative sign carefully.
Numerator calculation: . The 2s cancel out (). The terms become .
The result over the common denominator is .
Key Takeaways
- Function notation means replacing every instance of in the formula with .
- When subtracting fractions, keep the denominator and operate on the numerators.
- Watch out for double negatives when subtracting algebraic terms, e.g., .
Common Mistakes
- Forgetting to bracket the second numerator, leading to (incorrect).
- Incorrectly calculating , for example forgetting to multiply the 4 by the 2 inside the bracket.
- Simplifying the fraction incorrectly (e.g., cancelling with the 4 or 5 without justification).
Things to Be Careful About
- Ensure all terms in the numerator are handled correctly during the expansion of brackets. The constant terms cancel here, which is a helpful check.
The table shows the heights of 180 sunflowers.
| Height () | ||||
|---|---|---|---|---|
| Frequency | 28 | 60 | 68 | 24 |
Complete the histogram.
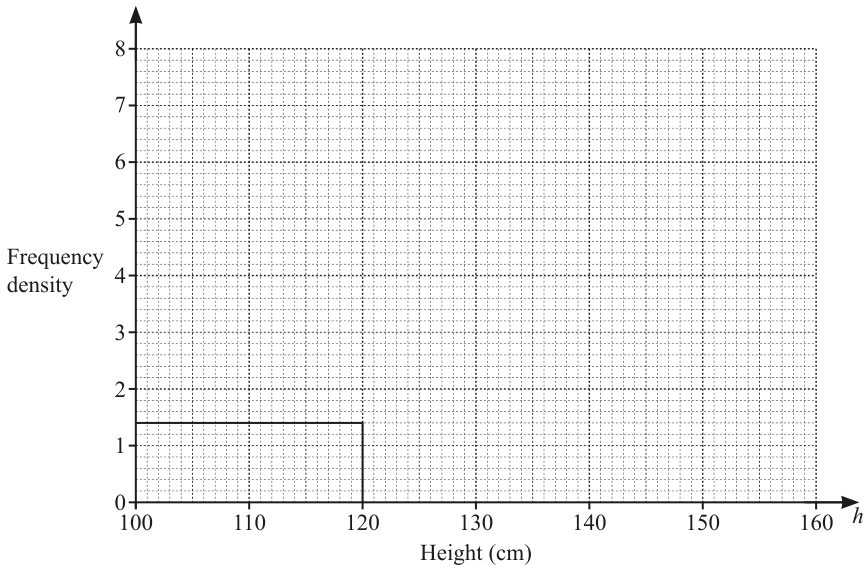
Approach
To complete the histogram, we must calculate the frequency density for each class interval. The formula is:
The first bar () is already drawn with height , which matches . We calculate the heights for the remaining three bars.
Working
For the interval :
Class width = .
Frequency = 60.
For the interval :
Class width = .
Frequency = 68.
For the interval :
Class width = .
Frequency = 24.
Answer
The histogram is completed by drawing three additional bars:
- A bar from to with height .
- A bar from to with height .
- A bar from to with height .
Histogram with bars: 120-140 at height 3, 140-150 at height 6.8, 150-160 at height 2.4.
Walkthrough
A histogram represents grouped data where the area of each bar is proportional to the frequency. When class widths are not equal, the vertical axis must represent frequency density, not frequency. The formula is .
- Analyze the given data: We have four intervals. The first () has width and frequency , giving a density of . This is already drawn.
- Calculate for : The width is . The frequency is . Dividing by gives a frequency density of . Draw a bar from to reaching up to on the vertical axis.
- Calculate for : The width is . The frequency is . Dividing by gives a frequency density of . Draw a bar from to reaching up to .
- Calculate for : The width is . The frequency is . Dividing by gives a frequency density of . Draw a bar from to reaching up to .
Key Takeaways
- In a histogram with unequal class widths, the height of the bar is the frequency density, not the frequency.
- Frequency density is calculated as .
- The area of each bar () equals the frequency.
Common Mistakes
- Using frequency as height: Drawing the bar for with height instead of . This is the most common error.
- Ignoring class width: Failing to divide by the correct class width (e.g., dividing by instead of for the last two intervals).
- Incorrect class boundaries: Drawing bars that do not touch the correct x-axis values (e.g., leaving gaps between bars in a histogram).
Things to Be Careful About
- Class width calculation: Ensure you subtract the lower boundary from the upper boundary correctly (, not ).
- Accuracy: Read the graph accurately. is just below , and is just below .
- No gaps: Histogram bars must touch each other; there should be no spaces between adjacent intervals.
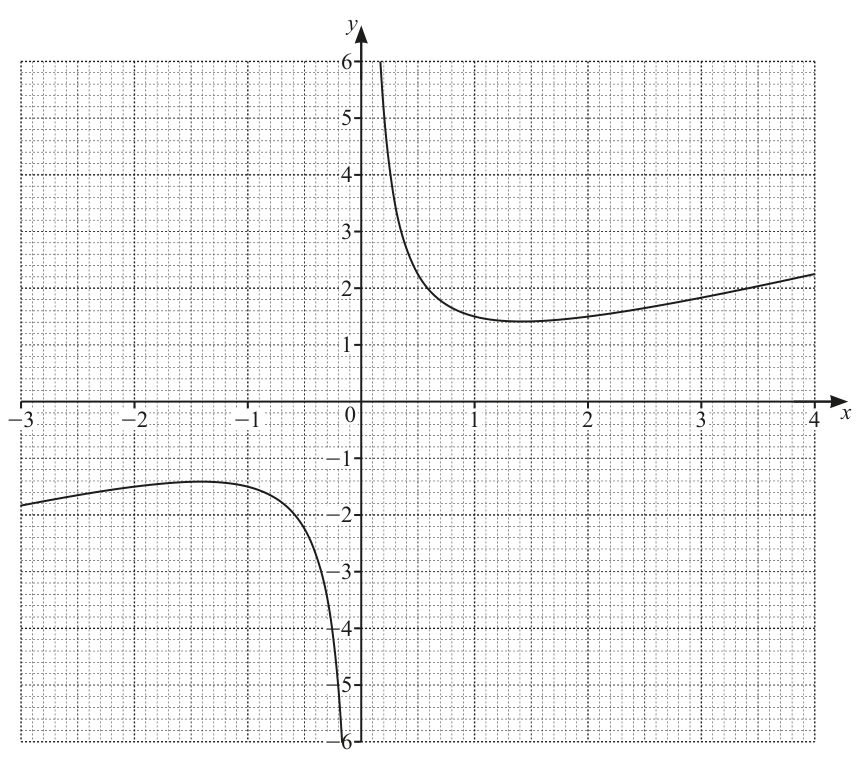
The diagram shows the graph of .
Approach
The gradient of a curve at a point equals the gradient of the tangent to the curve at that point. Draw a tangent to the curve at , pick two points on the tangent line, and compute .
Working
At , the curve passes through:
So the point on the curve is . Draw a straight line that just touches the curve at this point and follows its direction.
From the grid, read two points on the tangent. A good fit passes through approximately and (or any two points clearly on the drawn line).
Acceptable readings from the grid give a gradient between and .
Answer
0.25 (accept 0.2 to 0.4)
Walkthrough
The question asks for the gradient of the curve at . Since the question is on the non-calculator component and says "by drawing a tangent", we must estimate the gradient graphically.
Step 1: Find the point on the curve at .
So the curve passes through . Mark this point on the graph.
Step 2: Draw the tangent.
Place a ruler so it just touches the curve at and follows the direction the curve is heading. Extend the ruler in both directions across the grid.
Step 3: Read two points on the tangent.
Pick two points where the tangent crosses grid lines clearly. For example, the tangent might pass through and .
Step 4: Calculate the gradient.
The exact calculus gradient at is , confirming the graphical estimate is correct. The mark scheme accepts any value between and to allow for small drawing errors.
Key Takeaways
- The gradient of a curve at a point is the gradient of the tangent at that point.
- To estimate a gradient graphically, draw a tangent, pick two well-separated points on it, and compute .
- Always verify your answer against the grid scale before finalising.
Common Mistakes
- Drawing a secant line through two points on the curve instead of a tangent at the single point .
- Reading the wrong axis or miscounting grid squares (each large square is 1 unit; each small square is units).
- Giving a gradient that is clearly outside the mark scheme range ( to ), indicating the tangent was drawn poorly.
- Forgetting that the mark scheme requires the tangent to be drawn ("www" / "B1 for tangent ruled"); a correct numerical answer without a visible tangent line scores no method marks.
Things to Be Careful About
- The mark scheme awards B1 for the tangent being ruled and B1 for the gradient value. Both are needed for full marks.
- The answer must be in the form a decimal between and ; do not round to an incorrect number of decimal places.
- On the non-calculator component, the grid reading must be done by hand — count small squares carefully (each small square = units on both axes in this diagram).
- The point must be on the curve; double-check by substituting into .
Approach
We are given the curve and asked to solve graphically. Rearrange the equation so that the left-hand side matches the given curve, then the right-hand side gives a straight line to draw on the same grid. The solutions are the -coordinates where the curve and the line intersect.
Working
Start with the equation to solve:
Add to both sides:
Add to both sides so the left-hand side becomes the given curve:
Since the left-hand side is (the given curve), the right-hand side must equal at the intersection points. So draw the line:
This line has -intercept and gradient . Plot two points, for example and , and draw the straight line through them.
The solutions of the original equation are the -coordinates where this line crosses the curve .
Reading from the grid:
- One intersection is in the third quadrant near , so (accept to ).
- The other intersection is in the first quadrant near , so (accept to ).
Verification (algebraic):
Multiply through by :
These confirm the graphical readings.
Answer
(Accept to and to .)
x = -0.45, x = 0.85 (accept -0.6 to -0.4 and 0.7 to 0.9)
Walkthrough
The question asks us to solve using the given graph of . We cannot solve this algebraically by hand easily (it leads to a quadratic with irrational roots), so we must use a graphical method.
Step 1: Rearrange the equation to match the given curve.
We want the left-hand side to become . Start with:
Move the terms not involving to the right:
Now add to both sides to build the curve expression on the left:
Step 2: Identify the line to draw.
The left-hand side is exactly the curve already plotted: . So at any intersection point, the right-hand side must also equal . Therefore, draw the straight line:
This line has -intercept and gradient .
Step 3: Draw the line on the grid.
Plot two points on :
- When , , so plot .
- When , , so plot .
Draw a straight line through these points and extend it across the grid.
Step 4: Read the intersections.
The line crosses the curve at two points. Read their -coordinates from the grid:
- One intersection is in the third quadrant (left branch of the curve): .
- The other intersection is in the first quadrant (right branch of the curve): .
The mark scheme accepts to for the negative root and to for the positive root, allowing for graphical estimation error.
Key Takeaways
- To solve an equation graphically using a given curve, rearrange the equation so one side matches the curve and the other side is a simple line .
- The solutions are the -coordinates of the intersection points of the curve and the line.
- Always verify your rearrangement by checking that the algebra is reversible.
Common Mistakes
- Rearranging incorrectly, e.g. writing instead of . This is the most common error — forgetting to add to both sides.
- Drawing the wrong line (e.g. ) and getting only one intersection or the wrong intersections.
- Reading the -coordinates of the intersections instead of the -coordinates. The question asks for values of .
- Not drawing the line long enough to see both intersections.
- Giving answers outside the mark scheme ranges ( to and to ), which indicates poor line drawing or poor reading of the grid.
- Forgetting that the mark scheme requires the line to be drawn ("M2 for line ruled"); a correct numerical answer without a visible line scores no method marks.
Things to Be Careful About
- The mark scheme awards M2 for drawing the correct line (or partial credit M1 for or ). Both marks require the line to be visibly drawn on the grid.
- The final answers A1 are dependent on M2 — you must have drawn the correct line to get the intersection marks.
- On the non-calculator component, graphical readings are inherently approximate; the mark scheme gives wide acceptable ranges ( to and to ) to accommodate this.
- The line passes through and — these are easy points to plot accurately on the grid.
- Do not try to solve by hand and expect to get the exact irrational roots; the question is designed for a graphical solution.
Approach
Use the formula for the inverse of a matrix:
where .
Working
For , we have , , , .
The determinant is
So
This can also be written as
Answer
1/2 [[0, 1], [-2, 3]]
Walkthrough
We are asked to find the inverse of the matrix . The inverse of a matrix is found by swapping and , changing the signs of and , and then dividing every entry by the determinant .
First calculate the determinant: . Since this is not zero, the inverse exists. The swapped and sign-changed matrix is . Dividing by the determinant gives the inverse.
The mark scheme allows either or the equivalent matrix with the multiplied in, .
Key Takeaways
- The inverse of a matrix exists only when the determinant is non-zero.
- The formula is the standard tool.
- An inverse matrix can be left as a scalar multiple of a matrix or written with the scalar multiplied in.
Common Mistakes
- Swapping the wrong entries or forgetting to change the signs of and .
- Forgetting to divide by the determinant.
- Computing the determinant incorrectly, especially the sign: , not .
- Not simplifying the final entries when the scalar is multiplied in, though the mark scheme accepts either form.
Things to Be Careful About
Here , , , , so the determinant is . Note that is , and subtracting it gives . The answer must be exact; no decimal rounding is needed. On the non-calculator component, show the determinant and the division by by hand. The mark scheme awards B1 for the correct matrix before the scalar is applied, so partial credit is available if the determinant step is missed.
Approach
Since , multiply both sides on the left by :
Use the inverse found in part (a).
Working
Using ,
Multiply the matrices:
Answer
[[2], [-1]]
Walkthrough
We have . To isolate , multiply both sides on the left by . This gives . Order matters: the inverse must be on the left because is multiplied by on the left.
Substitute the inverse from part (a). Then multiply the matrix by the column vector. The first entry is and the second is . Dividing by the determinant gives .
An alternative accepted method is to write and use , giving and , so and .
Key Takeaways
- To solve , multiply on the left by : .
- Matrix multiplication is not commutative, so the order of multiplication is essential.
- A matrix equation can also be solved by writing out the component equations.
Common Mistakes
- Multiplying instead of ; the dimensions do not match and the result is wrong.
- Arithmetic sign errors, especially .
- Forgetting to divide by the determinant after multiplying.
- Giving only the final column vector without showing the multiplication, losing the method mark.
Things to Be Careful About
The mark scheme awards M1 for the correct multiplication , or for the equivalent equations. If no working is shown but the final answer is correct, SC1 is available, so show the multiplication to secure the method mark. The final answer must be ; do not leave it as unless you then simplify. Since this is the non-calculator component, all arithmetic should be done by hand.
Solve
= ______
Approach
To solve the equation , we first eliminate the denominators. The most direct method is to multiply every term in the equation by the common denominator . This converts the fractional equation into a polynomial equation which can then be simplified and solved.
Working
Multiply the entire equation by :
This simplifies to:
Expand the brackets on both sides:
LHS:
RHS: which is
So the equation becomes:
Subtract from both sides (the quadratic terms cancel):
Collect the terms on one side and the constant terms on the other. Add to both sides and subtract 3 from both sides:
Divide by 4:
Simplify the fraction:
Check validity: The original denominators are and . If , neither denominator is zero, so the solution is valid.
Answer
1/2
Walkthrough
The problem asks us to find the value of that satisfies an equation containing two algebraic fractions.
-
Eliminating Denominators: The first step in solving rational equations is to get rid of the fractions. We look at the denominators: and . The least common multiple of these is their product, . By multiplying every single term in the equation by this product, the denominators cancel out.
- For the first term , the cancels, leaving .
- For the second term , the cancels, leaving . Note the minus sign applies to the whole term.
- For the constant term , we just multiply it by the full denominator .
-
Expanding Brackets: Now we have a polynomial equation. We must expand all brackets carefully.
- LHS expansion: . Then . Combining these gives . A common mistake here is forgetting to distribute the negative sign to the , resulting in .
- RHS expansion: .
-
Simplifying: Since there is an term on both sides, subtracting removes the quadratic nature of the equation, leaving a linear equation (). This is a crucial simplification step.
-
Solving for : We group the terms on one side and constants on the other. Adding to both sides gives . Subtracting 3 gives . Dividing by 4 yields .
Key Takeaways
- Always multiply every term in the equation by the common denominator, including any standalone constants.
- Be extremely careful with signs when expanding brackets, especially when a negative number precedes the bracket (e.g., becomes ).
- Check if higher-order terms (like ) cancel out; if they do, the equation might be simpler than it appears.
- Always check that your final answer does not make any original denominator zero (extraneous roots).
Common Mistakes
- Sign Errors: Expanding as instead of . This leads to incorrect coefficients for the linear term.
- Incomplete Multiplication: Multiplying only the fractions by the common denominator but forgetting to multiply the RHS '1' by the full denominator , or incorrectly distributing it.
- Algebraic Expansion Errors: Incorrectly expanding as (missing the middle terms) or (sign error on the constant).
- Ignoring Domain Restrictions: Failing to check if the solution makes the denominator zero. In this case, is safe, but if we had found or , the answer would be invalid.
Things to Be Careful About
- Accuracy: Ensure all intermediate expansions are correct. The mark scheme awards marks for the expanded form , so showing clear expansion steps is important for partial credit.
- Form of Answer: The answer should be given as a simplified fraction () rather than a decimal (), although both are mathematically equivalent, standard practice in such algebra questions often prefers fractions unless specified otherwise. The mark scheme accepts "oe" (other equivalent), so is likely fine, but is safer.
- Non-Calculator Component: Since this is likely a non-calculator question, ensure you can perform the integer arithmetic and fraction simplification mentally or with written working without relying on calculator output.
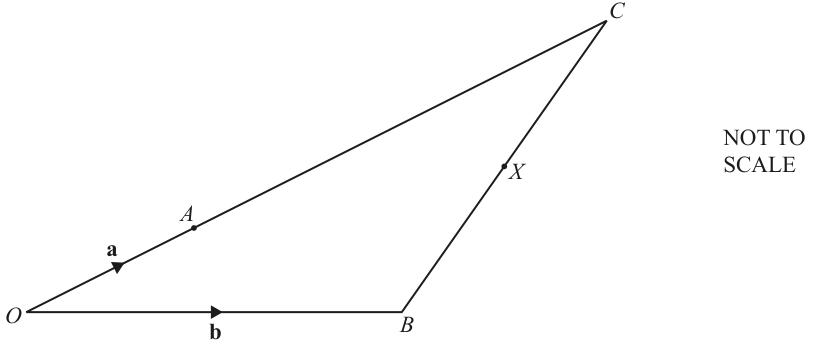
is a triangle.
is a point on such that .
is the midpoint of .
and .
Find the position vector of .
Give your answer as simply as possible in terms of and .
______
Approach
Find the position vector of using the given ratio . Then find by subtracting from . Use the midpoint property to find , and finally add and to obtain .
Working
Since lies on and , the total length is times the length . Therefore:
Using vector subtraction along the triangle , the vector is:
Because is the midpoint of , the vector is exactly half of :
Now, find the position vector by adding and :
Combine the terms:
Answer
2a + 1/2b
Walkthrough
First, we determine the position vector of relative to . We are given and the ratio . This means the total length is split into equal parts, so is four times , giving . This earns the B1 mark in the scheme (soi).
Next, we find the vector . Using the triangle rule for vector addition, , so . This is part of the correct vector route earning M1.
Since is the midpoint of , the vector is exactly half of . Therefore, . This intermediate result earns the B2 mark.
Finally, we find the position vector by adding and along the path :
This matches the required final answer.
Key Takeaways
- When a point divides a line segment in a given ratio, the full vector is a scalar multiple of the partial vector. If , then .
- The vector between two points can be found by subtracting their position vectors: .
- The midpoint of a segment divides the vector between its endpoints exactly in half: .
- Position vectors can always be built by following a continuous path from the origin and adding the vectors along that path.
Common Mistakes
- Forgetting that means , not or . Students often mistakenly write .
- Subtracting in the wrong order when finding , writing instead of .
- Halving the wrong vector or forgetting to halve both components of .
- Writing the final answer as without combining the terms properly, or leaving it as .
- Not following a continuous vector path from to ; for example, trying to add and directly without accounting for the gap between and .
Things to Be Careful About
- Ensure the final answer is expressed in terms of and only, with no other position vectors like or remaining.
- The answer must be fully simplified: is the simplest form; do not leave it as if fractions are preferred, though both are generally accepted. The mark scheme gives .
- Vector notation must be consistent: bold lowercase for vectors (, ) and arrows over point pairs (). In the final answer box, simply writing
2a + 1/2bis acceptable, but the working must show the vector arrows or bold notation to earn method marks. - The question is on the non-calculator component, so all vector arithmetic must be done by hand with exact fractions.